Thanks to Juliana, I've become addicted to Pinterest. It's this nifty site that lets you "pin" pictures, quotes, recipes, crafts, and basically anything you want. I have about 18 boards that are all different categories. I have a board for recipes, a board for quotes, a board for my bucket list, a board for crafts and many more.
My favorite board to add to is the recipe board and the craft board. I have been finding so many craft or gift ideas, or even ideas to get my room more organized and stuff. I decided that I am going to spend this semester doing school, of course, but in those moments when school gets to be too much, I'll go over to Pinterest and pin some stuff. Annnd the fun part is, this summer I am going to actually make some of those crafts and recipes and do some of those ideas!
Well the first "DIY" thing I did from Pinterest is the tangle-free headphones. Here's what it looks like:
I decided to do two different colors on the "connected" part of the headphones and then one color on each other "separate" headphones part. So like this:
The reason I did two separate colors on the headphone part is so that it is easier to tell which one goes in which ear. Yes, I am one of those people who can't stand to put the right bud in my left ear. So this way, instead of trying to see the tiny little R or L, I can just be like "Okay, this is green so it goes in my left ear." So much easier!
Now I would like to tell you how you can make your own tangle-free headphones. And yes, they do not really tangle anymore! Which is also nice since I always took 5 minutes untangling my headphones.
Materials:
Headphones
Two or more colors of embroidery floss.
Tape
Technically, you can do just one color, or you can do two colors, or you can do a lot of colors. It's totally up to you. I used the entire "roll" of my embroidery floss so if you are going to do only one color, you probably will need two. But if you do two or three colors, you should only need one thing of each color. Unless your headphones are super long in which you'd probably want to use a different roll on the "separate" parts.
So the first thing you're gonna want to do is tape your headphone to a hard surface. (It is easier this way so that it is not moving around while you're trying to tie the string around it.
I started from this end of the headphones.
You'll want to make sure the cord is lying flat too. Obviously it's not flat in this picture, but when you're doing it, make sure it's flat or the pattern of the string is going to look weird.
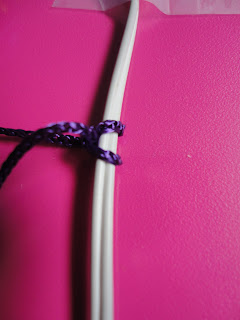
So next you will tie the string onto the headphones and make sure it's right up next to the edge. Unfortunately, I could not find anymore embroidery floss in the house so I had to use my graduation tassel to show you how to do the "tying."
So even though this picture doesn't show it, make sure that string is pushed all the way up!
Then you will lay the string across the headphones as shown.
Then bring it under the headphones and over the string and pull tight!
And obviously pull it tight and make sure it's right next to the other knot.
If you are doing alternate colors, I would do about 5 knots and then switch the color. Also, make sure the other colors string is being tied into the knot along with the headphones. So hold the string you are not tying, right next to the headphones so that the knot goes over it.
I hope this sort of makes sense. If you know how to make a friendship bracelet, it's pretty similar to that. I'm better at showing people things in person so hopefully my words will make some sense.
I've been using my headphones and absolutely love them. Now I have another pair of headphones that I'll probably do the same thing to.
Happy DIY!


